Saturday, January 31, 2015

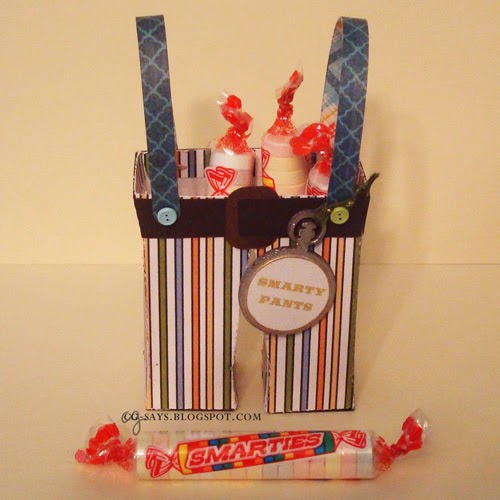
Smarties Pants for a Smarty-pants

I wanted to make a fun just-because gift for my husband, so I made this Pants-shaped box to hold some Smarties candies... he is my favorite smarty-pants!

I adapted the Santa Pants Bag from SVG Cuts' Happy Holiday Kit.


The box is made with a paper from Sweetwater's Family Ties collection. The belt & buckle are cut from a brown paper that is shiny on one side. The suspenders were cut from a scrap of Graphic 45 paper and attached with tiny button brads. I heat-embossed a wood pocket-watch in silver and added a sentiment in the Saddlebag font.


This box is 2.5 inches high, almost 4.5 with the suspenders. I decided to make a smaller one, about an inch smaller, and it's even more adorable.


Which size do you prefer? I can't decide which is better, and I definitely want to make more!

Inspiration/Challenges:
All Crafts Challenge Dec/Jan Challenge: Anything but a Card (2nd entry)
Decorate to Celebrate Challenge #92: Anything Goes

Update: This won Decorate to Celebrate Challenge #92!

Thank you for visiting,


Friday, January 30, 2015

Purple Poe

You still have a week to join the Purple challenge at One Stitch at a Time (OSAAT). 

I had so much fun making my purple book box last week that I decided to make another, smaller version to hold a copy of "The Raven" by Edgar Allan Poe.

This box is roughly 2.5 x 2.125 inches, and features "Poe Bust" by Ikesart. I printed Poe on shiny ivory cardstock, and printed the raven on a regular white paper. I colored the bird with black & glitter gen pens, fussy-cut it, and placed him atop the pallid bust.


Inspiration/Challenges:
Challenge Up Your Life: Box
Craft It Up & Link It Up Linky Party by Craftin Desert Divas: 3D Projects
DoubleClick Skittles #14: Use a bird


Thank you for visiting, and hope you'll join us at One Stitch at a Time,


Thursday, January 29, 2015

Pilin' on the Hearts - Shaker Card #2

You have until Saturday night to join our Hearts and/or Flowers Challenge at Pile It On!

Most of the paper used are actually scraps from a friend, and the pretty flowers were handmade by another friend. I used the Love Banner digi stamp from by Digital Delights to make two matching shaker cards (the 2nd card is showcased here).


I'm entering this card into these great challenges:
My Sheri Crafts Challenge #149: Valentine's day + Use a Heart
Wags 'n Whiskers: Hearts


Thank you for visiting & inspiring my crafting! Hope you'll join us at Pile It On,

Monday, January 26, 2015

Paisley Songbird

I really like the paisley shape, and I felt so clever when I realized that I could make birds from paisleys. I've been meaning to try the technique again, but I see that it's taken me over 4 years to get around to it!


FMS170
I grabbed this paisley cut file from the Silhouette store when it was a freebie. It's cut from silver and gold adhesive vinyls. I trimmed it and added feet, a beak & a Liquid Pearl eyeball. I used another Silhouette freebie for the sentiment and cut it from the gold vinyl.

For the card design, I was inspired by Freshly Made Sketches #170. The background is made with a shiny vanilla paper and a DP from Graphic 45. I added a border with orange Stickles and mounted the piece onto a blue card.

I'm pleased with how this came out. I think I'll use this design again.
Thank you for visiting,


Sunday, January 25, 2015

Pilin' on the Hearts

Our theme this week at the Pile It On Challenge is Hearts and/or Flowers. We're sponsored by Digital Delights, and so I used used their great freebie Love Banner to make two matching shaker cards (only one is showcased here).

Some friends came over last week for a day of crafting, and after cutting out some Valentine's projects on the Silhouette, I ended up with the scraps. I couldn't resist putting them to use, along with some papers & embellishments the same friends gave me at a birthday party ... a couple of years ago!


The outer heart frame is a black-and-white paper that I inked pink. I added a border of pink Liquid Pearls to the red heart frame. I used plastic from old packaging to cover the heart, adhered the piece with foam tape to a scrap of DP from the aforementioned birthday party, and filled it with die-cut hearts & pink microbeads.

I printed the Love Banner digi stamp twice: on a textured red paper and on a white cardstock. I cut the red piece with a border around the banners, and colored the white banners with Copics markers. I decorated it with pink-and-white baker's twine & black gems.

The background cardstocks are the only papers that aren't scraps. I embossed the light pink piece with a Sizzix folder.


Challenges/Inspiration:
    1. Bunny Zoe's Crafts: Hearts
    2. Clear It Out: Theme - Valentine/Love + Stash - Flowers (the handmade flower has been in my stash 2 or 3 years)
    3. C.R.A.F.T. #295: Recycling (scrap paper & packaging)
    4. DL.ART Thankful Thursday Challenge #149: Valentines
    5. DRS Designs #158: Lovely Hearts
    6. In the Pink: Pink & Pearlie (Liquid Pearls & pearl on flower)
    7. Kitty Bee Designs #39: Use Scraps
    8. Simon Says Stamp Wednesday Challenge: Have a Heart
    9. Sweet Stamps #205: Hearts
    10. TIME OUT Challenges: Valentine's Day with the optional twist of Hearts
    Update: This was a random winner for C.R.A.F.T. #295, and also a Top Pick for Kitty Bee Designs #39!

    Thank you for visiting & inspiring my crafting! Hope you'll join us at Pile It On,

    Say Something Purple

    OSAAT January Prize Pack
    This fortnight at One Stitch at a Time (OSAAT), our theme is Purple. StitchyBear's Digi Outlet has hundreds of digital products from many wonderful artists. Even if you don't use a store image, you'll still be in the drawing to win the super-duper January prize pack.

    Purple is a special color to me; my husband and I share a love of the color, and he even wore a purple suit for our wedding! I decided to use the Book Stamp by Sentimental Susan to make this small book box.


    The box template is from SVG Attic's discontinued Nevermore set (if anyone knows where I can purchase this file or something similar, please leave a comment). I love the scored page pieces! Used a purple cardstock for the binding, and covered it with a burlap-patterned paper. I inked the paper with Victorian Violet Brilliance pigment ink from Tsukineko.

    I made the sentiment in InDesign and heat-embossed it in purple on a shiny white paper. I inked the piece with the same violet ink that I used for the burlap-patterned paper. The book digi stamps were colored with Copics and place on top of the piece. I used an embossing tool to create little lines on the books' pages.

    I wrapped a striped grosgrain ribbon around the box, adhering it only to the front so that it would unwrap. To secure it, I used a tiny key charm from Cousin/Designs By Me. I put a little glittered flower on the ribbon's end-knot.


    I wanted to be able to keep charms in the box, so I made a cover for the interior box. I used two magnet strips to keep it closed, and added another tiny key.


    Inspiration/Challenges:
    2 Creative Chicks #22: No Cards
    All Crafts Challenge Dec/Jan Challenge: Anything but a Card
    Crafty Ribbons: Anything but a Card + Ribbon
    Cut it Up #63: Embossing & Die Cuts (SVGs)
    Loves Rubber Stamps #135: Digi Stamp + Letter B (Books, Box, Burlap, Binding)
    PDE Linky Party #36: 3D projects


    Thank you for visiting, and hope you'll join us at One Stitch at a Time,


    Sunday, January 18, 2015

    Pilin' on the Winged Monkeys

    Our theme this week at the Pile It On Challenge is Fantasy. We're sponsored by Sweet Pea Stamps, and my imagination was sparked by Elphaba and Her Monkey by Charmaine Flannery. I must admit that I've neither read nor seen Wicked, but I've always been pretty freaked out by the Technicolored flying monkeys in The Wizard of Oz. Despite knowing the end of the story, I like the idea of a life-long friendship between a girl and her Winged Monkey!


    click images to enlarge
    I colored the image with Copics, adding highlights to her hair with green Smooch pearlized accent ink and fur to the monkey with a purple Wink of Stella pen. I had created a frame for the image before printing it, and colored that with a Copic and covered it with lime green Stickles glitter glue.

    Using the image's oval shape, I hand-traced and cut the pieces to make a simple notch swing card.

    The patterned papers, flying monkeys and grown-up Elphaba are from "The Magic of Oz" collection by from Graphic 45. I fussy-cut the characters and colored the witch's face to match the front image.


    Cheerful Sketches
    Challenges/Inspiration:
    Cheerful Sketches Challenge Blog: Sketch
    Crafty Hazelnut's Patterned Paper Challenge: Anything goes (2nd entry)
    Love to Scrap: Initial Challenge - LTSCB (Leaf ribbons, Thread on larger button, Stickles, Compass on witch's belt, Buttons)
    Shopping Our Stash #184: Use a hidden element (2nd picture) + Stash (buttons, designer paper)
    Use Your Stuff: Buttons + Stash (small flower buttons have been in my stash for at least 1 year)


    Thank you for visiting & inspiring my crafting! Hope you'll join us at Pile It On,

    Saturday, January 17, 2015

    Sweet 16

    One of our nieces is turning 16, so I made her this "sweet" card.


    I couldn't resist making this into a shaker card. The stamp is actually 3 stamps from the "Bake a Cake" set by Jennifer Ellory; I stamped them all at once onto a shiny black paper and heat-embossed it in white. I cut out the cake parts with a knife and covered the hole on the inside with a piece of plastic from old packaging. I used foam tape to attach the front piece to a multicolored patterned paper and filled the pocket with glow-in-the-dark chunky glitter. I had a bit of fun with my new sparkly white Wink of Stella pen to create what I hope is a whimsical background! I wrapped baker's twine around the shaker piece, partly to hide the foam tape. I topped the cake with glittery stickers.

    The background is a black-and-white, music-themed paper backed onto another piece of shiny black paper. I heated-embossed the entire piece with holographic embossing powder. Tip: when heat-embossing layered pieces, you may get some warping. If it's a background, you can die-cut a section of the piece and cover the hole with the top image.

    The base card is a double-sided shiny cardstock. I used more of the music-themed paper to decorate the inside. The message section is die-cut and I added detail with blue & purple Wink of Stella pens.

    Our niece & her 17-year-old sister have only been in our lives about 5 years, but we've so enjoyed watching them grow into free-thinking young adults.


    Inspiration/Challenges:
    Brown Sugar #129: Birthday for a Girl
    Fan-Tastic Tuesday #68: Use Something Recycled (plastic from old packaging)
    Sparkle N Sprinkle January Challenge: Embossing Powder & Loose Glitter (2nd entry)
    The Pink Elephant: Shaker Cards


    Thank you for visiting,


    Sunday, January 11, 2015

    Something New at OSAAT

    OSAAT January Prize Pack
    This fortnight at One Stitch at a Time (OSAAT), our theme is Anything Goes with Something New. StitchyBear's Digi Outlet has hundreds of digital products from many wonderful artists. Even if you don't use a store image, you'll still be in the drawing to win the super-duper January prize pack.

    My "new" item is the gold-and-glitter peel-off stickers. I also used a new transfer sheet to make this New Year's shaker card using A Toast from Reece's Scrap Pieces as well as this great freebie sentiment from Coosty Creations.


    I filled the card with a mix of clear & gold microbeads.


    Inspiration/Challenges:
    Card Mania #64: Make it Sparkle! / Let's shine!
    Creative Moments: Anything goes/ New Beginnings
    Hambo Hoedown January Challenge: New Year's Stash
    The Male Room: New beginnings (Few men could resist something sparkly for the New Year! I made this for a man, Roosevelt.)
    Natalie and Amy's Challenge #28: All Things New!
    Paradise of Stamps: New Year


    Thank you for visiting, and hope you'll join us at One Stitch at a Time,


    Sunday, January 4, 2015

    Thank You at UnstampaBelles

    The UnstampaBelles January challenge is Thank You, with the fun optional twist of incorporating something from just outside your window and blog about it.
    You can link up your projects until the end of the month, but remember that you can't use ANY STAMPS (digi or otherwise)!

    We live in Baltimore city, and my view from our backyard is of Marian House, a temporary residence for women. During most of the year we all enjoy a bit more privacy thanks to our over-hanging mulberry tree, but the leafless Winter opens up a clear view of the gray-brick building (plus a lovely view of the stars). 
    This Christmas season, they decorated some of their windows with lovely hand-made decorations and lights, which inspired the colors on the card's window. As the holiday ends, the windows are re-populated by their resident cats. I cut this cat from a sheet of Graphic 45 DP. I'm not sure I've ever seen a Calico up there, but it would definitely be good luck!

    The window is cut with a Sizzix/Susan's Garden die. I created the "Thanks" letters in SCAL using the Harrington font. I colored the windows with Smooch & Wink of Stella glitter inks, and coated the whole thing with Glossy Accents to give it a glass look as well as reinforce the die-cut letters.

    I recently won a gift certificate to Simon Says Stamp, and one of the goodies I got was a brick wall stencil by MFT, which I've been itching to use. I applied a generous amount of gel medium over the stencil, removed the plastic stencil, and covered it with silver embossing powder.I found that I need to let the gel dry a bit before I could easily heat-emboss it, but I'm happy with the rough texture I ended up with.

    Since it's pretty barren here in Maryland, I added white & brown leaf ribbons to the scene. When this post published on January 4, 2015 it was rainy and gray and those beautiful lights were still up. Love my neighborhood!

    Inspiration/Challenges:
    DRS Designs #155: Stencils (brick wall is made with a stencil)
    Top Tip Tuesday: Make Your Own - something that's not store bought (background & letters)


    Thank you for visiting, and hope you'll join us at UnstampaBelles,