Monday, March 30, 2015

Super thumbs-up!

I had some crafty fun today making this Congratulations card with "Thumbs Up Kid" by KennyK and my favorite Flip-It Card Sizzix die. The papers are scrap pieces from a long-hoarded Recollections pack. I printed the image on neon green paper and colored it with Copic markers and Wink of Stella pens. The sentiments are heat-embossed in neon orange on wood embellishments. I traced the sentiments with a black pen, and edged the word bubbles with a black marker. I added borders with glittery-green tape.


Challenges/Inspiration:
KennyK's Krafty Krew #191 : Fancy Folds
Crafty Hazelnut's Patterned Paper: Anything goes with Patterned Paper background (2nd entry)

Update: This made the Top 3 for KennyK's Krafty Krew #191!

Thank you for visiting,

Sunday, March 29, 2015

Pilin' on Spring

This week at the Pile It On Challenge we're featuring Easter/Spring projects. We're sponsored by Sherri Baldy/My Besties, so I used this little cutie that I won some time ago to make a springtime card:

The little airplane is a wood embellishment that I heat-embossed in silver & trimmed down with scissors. I used one of the Besties from their March Prize Pack for the tiny pilot. Both images are Colored with Copics & glitter/gel pens.The large image is attached with an Action Wobble, so it pops out but folds flat.

I created the border by wrapping Baker's Twine around some flower-shaped brads. I added glitter glue to the flowers' centers. For the sentiment corner, I decorated the brad with pre-made flower pieces and made the banners in InDesign with the Snidely font.

The front is a pre-embossed DP that I've had in my stash forever, as is the patterned cardstock I used for the base.


Challenges/Inspiration:
Add a Little Dazzle #67: Spring or Anything Goes
Action Wobble Challenge: Anything Goes with an Action Wobble (2nd entry)
Aud Sentiments Challenge #128: Anything Goes + Sentiment
Cards in Envy: Spring + Flat/A2 Card (this does fold flat, with just a bit of bump from the brads... am sending it with one stamp)
Graph'It Colour Challenge #13: Springtime + coloring
Just Inspirational Challenges: Cute
Little Claire's March Challenge: Springtime
QKR Stampede #132: Add a Sentiment
Really Reasonable Ribbon: Bright Spring Colors with Ribbon or Trim (I used Cool yet bright Spring colors + Baker's twine)


Thank you for visiting & inspiring my crafting! Hope you'll join us at Pile It On,

Tuesday, March 24, 2015

Happy Birthday toast

I needed a last-minute Birthday card, so I scrounged through my stash for the components for this card. I made this little scene using stamps from Paper Smooches' Wake Up set.
I colored the image with Copic markers and added detail with glitter glue & Glossy Accents. The tiny glasses are cut from cork with a Memory Box die. I decorated the scalloped circle with Liquid Pearls. The background DP is by Studio Calico. The Loops were cut with a Sizzix border die from cork & a shiny Recollections paper. I also cut a border from a shiny green Core'Dinations cardstock and used some of the negative pieces in the Loops. I finished the card with my favorite corner punch & a shiny brown paper. This was a fun project to make, and I may use the concept again.

Challenges/Inspiration:
Pals Paper Arts: Sketch #244
Seize the Birthday: Focus on the Sentiment/ Anything Birthday


Thank you for visiting,

Sunday, March 22, 2015

Pilin' on the Sentiment

This week at the Pile It On Challenge we're challenging you to focus on the sentiment. We're sponsored by StitchyBear's Digi Outlet, so I used this quote by Thoreau from Dreams Sentiments by Coosty Creations.


Some years ago, my mom lent me some heavy-duty fringe scissors which I'm only now getting around to using! I went through my ever-growing scrap box for my ROY G BIV papers. I used my Silhouette Cameo to create the gold & white frames. I used a ruler & a blue gel pen to draw the out border.

I colorized the sentiment by Coosty Creations in Photoshop and printed it on a shiny white paper. I cut some clouds with an IO die on my BigShot from the same paper, and used them to frame the sentiment. To bring it all together, I added a gemstone embellishment which I had partially colored with a blue Copic.

I made the inside message section by masking the center, coloring it with Copics, and added a border with the same blue pen I used on the front. The little cloud inside is actually leftover from another project; it was stamped with blue ink & I added detail with a glitter pen.


Be sure to check out all the projects Pile It On! this week. My card ended up being very similar in design to Jenn's and similar in style to Helen's...great minds think alike I guess! Many thanks to the SBDO artists for letting us play with their great images.


Challenges/Inspiration:
Crafty Catz: No Designer Paper
Crafty Sentiment Designs: Bright Colors
Cuttlebug Mania: Use/make a Frame + die cuts (clouds)
Scrapbooker PhD #21: Bling
Shopping Our Stash #193: I Made This (fringed background) + Stash (scrap paper)
Sweet Stampin' Challenge: Sentiment as the Focus + [digi]stamp
Whimsy Inspiration #81: Use A Die Cut (clouds)
WordArt Wednesdays #175: Anything Goes

Update: This was a Top Pick for Shopping Our Stash #193!


Thank you for visiting & inspiring my crafting! Hope you'll join us at Pile It On,

Wednesday, March 18, 2015

Oh Boy! - Guest Designer at Crafting by Designs

I was honored to have my Heart Easel Card chosen as a Spotlight project for Crafting By Designs #62, and pleased to also be asked to Guest Design with their fabulous team for this week's challenge: Masculine Project.

This card is made with my Accordion/Fancy Label die by Karen Burniston/Elizabeth Craft Designs. I live in Baltimore, Maryland, where National Bohemian Beer is the traditional beer of choice at Baltimore Orioles baseball games. Because everything in my life has become craft-related, the last time my best friend came to visit we enjoyed some Natty Boh ... solely so I could save the cans & bottle caps! I cut the cans into metal sheets and die-cut them in my BigShot with Sizzix dies to make the funky leaves. I flattened the bottlecaps with my BigShot as well.


Keeping with the recycled theme, I cut the base of the card from a foam carry-out container. If you look closely, you can see how the die also embossed portions of the foam.


I used the City Buildings by StudioIlustrado from Silhouette for the city borders and stencils.

The sentiment is set in Buffalo Nickel from FontSpace, with special characters from Brannboll from DaFont and Pea Minjee from Fonts for Peas.


Inspiration/Challenges:
Crafting By Designs #62: Masculine
Crafty Calendar: Add some metal
Our Creative Corner: Junk in your Trunk (package foam, bottle caps, aluminum cans)
Recycle, Re-purpose, Re-invent: Recycled items 
Southern Girls #106: Boys Boys Boys

Thank you for visiting, and hope you'll join us at Crafting By Designs ,


Sunday, March 15, 2015

Pilin' on the Jellies

This week at the Pile It On Challenge we're challenging you to use 3 of something. I used 3 images, 3 bubble embellishments, and 3 bubbles inside the card.

This card is, coincidentally, for our nephew's third birthday. We visited the National Aquarium in downtown Baltimore the last time he was here, and I thought of the fun we had at their gorgeous jellyfish exhibit when I saw this cut digi by our sponsor, Kitty Bee Designs.


The digi stamp comes with the big & little jellies, so I added a smaller version of the little one. I printed the trio twice, once on fluorescent orange paper, and again on a shiny white paper which I then heat-embossed with neon orange powder. Although I usually get good results heat-embossing from directly my printer, but not this time, so I went over the lines with a Versamark pen and heat-embossed them again to get fuller coverage. I inked the white paper with a light blue ink. I also used a TH stencil to create the splashes in a darker blue.

I used recycled plastic packaging and a foam sheet to make the shaker portion. I filled it with blue MS microbeads and small glass beads.


The sentiment is cut from a neon blue paper with a QuicKutz die. I backed the paper with an adhesive sheet before cutting it, so the letters were individual stickers. I outlined the letters with a blue marker after die-cutting them but before taking them off the sticker backing.

The fish-patterned paper is by Recollections. The neon blue and orange papers are from Target. I used a dark blue paper as the card base, and decorated the inside with 3 sizes of circles, including a white one for the message.

Challenges/Inspiration:
Bloggers: Happy Birthday
Chocolate, Coffee & Cards: For a Child
Connie Can Crop: Birthday Wishes
Crafts Galore Encore: Anything Goes with a Stamp or Digi
Crafty Hazelnut's Patterned Paper: Anything goes with Patterned Paper background
Crafty Sentiment Designs: Birthday


Thank you for visiting & inspiring my crafting! Hope you'll join us at Pile It On,

Saturday, March 14, 2015

Pop-out Flower Vase Card

I really enjoy the Card-in-a-box technique (also called a Box Card or Spring Card), so I've been wanting to try the Box-on-a-card version I saw on CraftyGirl's blog. I wanted to create a simple scene, so I kept to a white-and-blue color combo except for the bright images.


The background is a textured white cardstock. The window is cut with a MFT die from an off-white, textured, adhesive cardstock from DCWV. The bottom border is cut from the same adhesive paper. The "vase" is a DP from Graphic 45. It's 2.5 inches tall, scored at 2 inches to create a box that folds flat to fit in an envelope. The tags are from Sizzix/Doodlebug die/stamp set, and I attached them with a brad so that they could fold in when mailing.

The flowers & bee are from a Sizzix/Hero Arts die/stamp set. Instead of using black ink for the stamps, I used different greens for the flowers & orange for the bee. The images are colored with Copic markers and glitter pens. I also added some detail with Liquid Pearls.


Inspiration/Challenges:
Card Mania: Spring
Cut it Up #66: Moving components (pop-out box & tags)
Dream it Up: Marching Into Spring

Update: This card placed in the Top 3 for Cut It Up Challenge #66, and I was also the lucky prize winner!

Thank you for visiting, and a special thank-you to CraftyGirl for the inspiration!


Thursday, March 12, 2015

Sprintime fun at The Crafter's Cafe Challenge

I'm excited to announce that I've been accepted to the Crafter's Cafe Challenge Design Team! We're a weekly challenge with two teams, so every two weeks starting April 8th I'll be sharing my projects inspired by their themes & sponsors. However, I couldn't help but stick my nose in and make a project for this week's challenge!

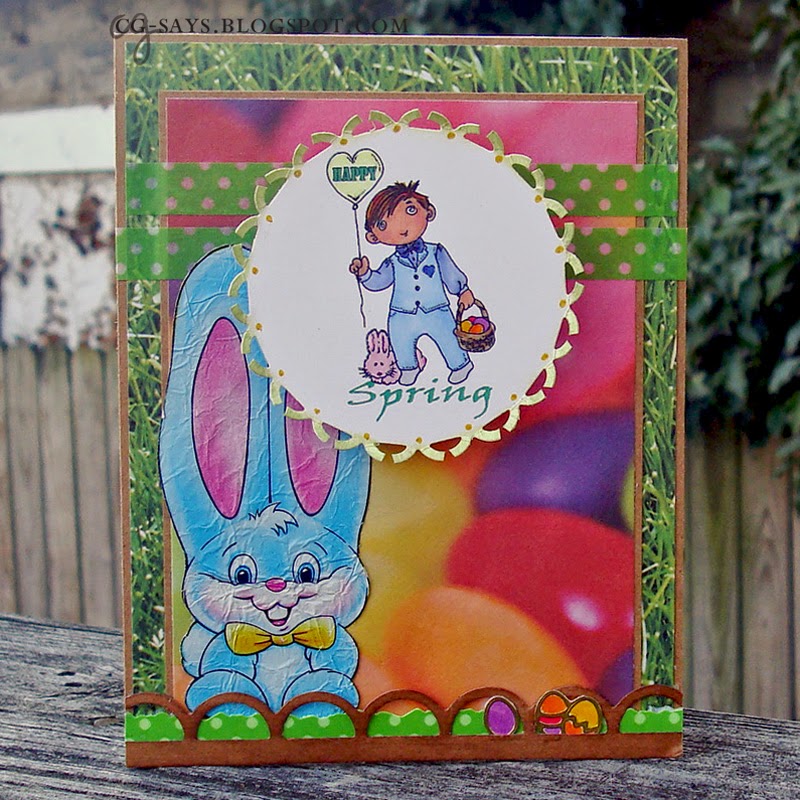
The Crafter's Cafe Challenge this week is a Recipe Challenge: 1 Image, 2 DP & 3 Embellishments. Our sponsor is Rick St. Dennis, so I used this sweet image he gave away as a freebie back in 2013. The grass- and jellybean-patterned papers are by Recollections/Michaels. My three embellishments are the Washi tape, the tinfoil bunny (from an actual chocolate wrapper) and the egg outline stickers.
click to enlarge
I added the word "Happy" to the boy's balloon and colored the image with Copic markers. I cut it with a scalloped circle die, trimmed the arches to create a grassy effect, inked the border with green ink, and added some dots with a gold pen. I adhered it to the card with an Action Wobble.

Inspiration/Challenges:
Action Wobble Challenge: Anything Goes with an Action Wobble
The Crafter's Cafe Challenge: 1 Image, 2 DP & 3 Embellishments
Our Daily Bread Designs Challenge #230: Sketch
The Kraft Journal #214: Pick 3 (Bunnie, Die Cut, Washi Tape) + Kraft


Thank you for visiting & hope you'll join us at The Crafter's Cafe,


Sunday, March 8, 2015

Pilin' on the Green

This week at the Pile It On Challenge our theme is Green. Whether you're dreaming of spring, saying good-bye to summer, or feeling a bit Irish, make sure you add plenty of green to your project. We're sponsored by Meljen's Designs, so I used her whimsical Shamrock Bouquet.


The lattice banner was made by folding the pre-glittered cardstock in half & cutting it with a die by QuicKutz. I poked the decorative holes out of one side only, and added some scrap ribbon & yarn. The bottom piece is the negative from the lattice die-cut, with a touch of lime green Liquid Pearls.

I made the sentiment with Snidely (you may remember this sentiment from my Friday the 13th Valentine) and printed it in a dark green on a light green paper. I printed the Shamrock Bouquet onto a bright green paper and colored it with Copic markerss. I used foam tape to pop up a section of the image. I cut each piece with a Spellbinders/Nestabilities die and used that same die as a stencil for the matching matte. The mattes are cut with the same paper as its top piece, but inked with key lime VersaMagic chalk ink and edged with a green Copic. The tops are also popped up with foam tape.

The backing piece is a Core'Dinations cardstock that I sanded a bit to reveal the lighter-green core. It was difficult to leave so much open space, but I felt that the design was stronger without more embellishment. The card base is a green cardstock, so I added a white message section inside.


Mojo Monday #387
Inspiration/Challenges:
Artistic Inspirations: Anything Goes with a Twist of Green
Craft It Up & Link It Up Linky Party by Craftin Desert Divas: Green
Creative Card Crew #82: Green
Creative Moments #63: Anything Goes/Spring Green
Cuttlebug Mania: Monochromatic Green + Dies
Going Grey With Scrap-Creations: Let's see some Green
Mojo Monday: Sketch #387 (2nd entry)
QKR Stampede: Green
Simon Says Stamp Monday Challenge: "Just a hint of Clover"

Thank you for visiting & inspiring my crafting! Hope you'll join us at Pile It On,

Saturday, March 7, 2015

Gumball Birthday

Mom sent me a box this week which included some wonderful books my grandparents & parents collected during their travels as well as this fun "Goody Goody Gumballs" stamp & die set by Taylored Expressions. I wanted to make the Gumball Machine 3D, so I used the die to cut pop-up layers from foam take-out containers. This worked almost better than regular craft foam, and was certainly easier than using foam tape. The images were stamped on white paper & colored with Copics. The sentiment was stamped on yellow paper, die-cut & backed with more foam, and colored with a Copic & covered in Glossy Accents. The banner is cut from a Washi sheet. The backing DP is from my stash, as are the acrylic embellishments.


Die Cuttin' Divas #205
Inspiration/Challenges:
City Crafter Challenge #251: Washi Tape
Die Cuttin' Divas #205: Sketch + Die Cut


Update: This was chosen Showcased for Die Cuttin' Divas #205!


Thank you for visiting,


Tuesday, March 3, 2015

Rustically Thankful

One of my favorite things about volunteering at Paper Playful is that I keep updated on all the great crafting challenges out there. While doing Monday Challenge List this week I was inspired by two of my favorite long-time challenges, Mojo Monday and The Shabby Tea Room.


I made the flower with a pre-cut white doily, folding it snowflake-style and inking it with ColorBox pink pigment ink. I colored the wood starburst with bright green Liquid Pearls, and attached it all with Glossy Accents. The stem-and-leaves is die cut. The sentiment, by SP & Company, is heat-embossed in bright pink on a white die-cut.

The banner is made with a textured gray cardstock that I stamped with a light silver ink & heat-embossed with a sprinkle of glitter. I covered a strip of white paper with a decorative tape. The green bracket shape is actually a scrap from a previous project. The background patterned paper is from my stash, and I placed it all on a kraft base.

This was a relatively quick project, and a design I'll probably use again. Thanks for the inspiration!

Shabby Tea Room #247
Inspiration/Challenges:
Mojo Monday: Sketch #387
The Shabby Tea Room: Pop of Pink photo inspiration


Update: This was an Honorable Mention for The Shabby Tea Room #247.
Thank you for visiting,