Friday, April 29, 2016

Vintage/Shabby Chic at Crafting with Dragonflies

This fortnight at Crafting with Dragonflies our theme is Vintage/Shabby Chic. We're also having a Design Team call, if you'd like to join our great team!

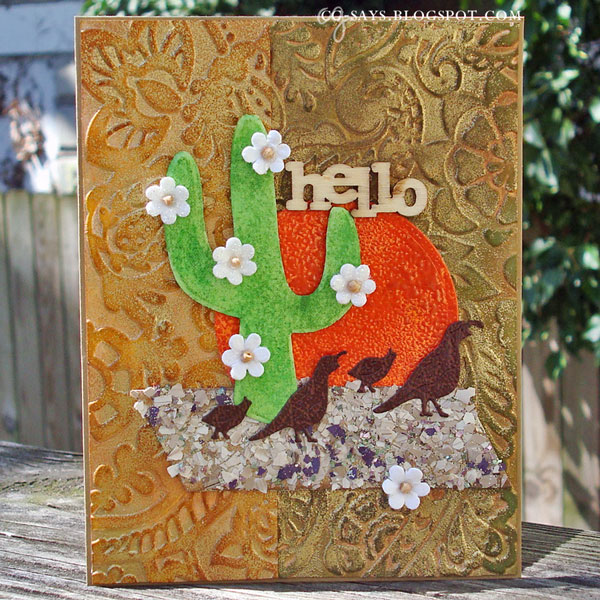
For this challenge, I went the Shabby Chic route. This is a really fun style to work with.


I started by inking an embossing folder with yellow & orange inks (the ombre effect looks so much better in person!) and added clear & glitter embossing powders to give it texture.
The chipboard flowers have been in my stash for years; I inked them with 3 purple inks, embossed them with the same folder I used for the background, and added 3 purple embossing powders.
The green buttons are from A Muse Studio; I won them at Chris's great Amusing Challenge. I tied some twine onto them before gluing them to the flowers.
For the sentiment piece, I used a Graphic45 die/stamp set that I recently bought from Monica via the Craft Room Destash Facebook group. I heat-embossed the sentiment in burgundy onto vellum. The lovely seam binding is from Paper Sweeties.


http://www.pinkandmainchallenges.blogspot.com/2016/04/challenge-8.htmlInspiration/Challenges:
Crafty Ribbons #149: Buttons
Pink & Main: Color Combo
Tuesday Morning Sketches: Sketch #349


Thank you for visiting, and hope you'll join us at Crafting with Dragonflies,

Monday, April 18, 2016

Primarily Prozac

I've had this funny sentiment rubber stamp from Viva Las VegaStamps for over 3 years, and I'm glad I finally had reason to ink it up! I matched it with a "coffee" die from Your Next Stamp & two takes on with primary colors.

I stamped the sentiment in black on a piece of notebook paper; I masked the explanation point on the original stamp & used an ampersand stamp instead. I cut the "coffee" from a red vellum & twice from a regular vellum that I colored green or blue.

The coffee stains were inked using a Tim Holtz stencil, directly onto a paper towel that I backed with cardstock.

I made the embossed background while trying out the faux patina technique; I got this sorta 3D effect by inking by embossing folder & running it through my BigShot twice. I didn't throw away this piece because I knew I'd find the perfect use for it, and this was it!

http://yournextstamp.com/blog/sketch-and-color-challenge-37/

Inspiration/Challenges:
The Sisterhood of Snarky Stampers #57: Embossing
Viva Las VegaStamps April Challenge: Coffee Fiends + VLV stamp (sentiment)
YNS Challenge #37: Sketch + YNS die


Thank you for visiting & inspiring my crafting!


Simply Fishy

If you're like me, you immediately took interest in this week's theme at Shopping Our Stash: You Stamped With What?!! People have come up with such great ideas!

I had the perfect object in my stash: a lattice-patterned plastic hanger that I've had in my stash for at least a year. I applied ink directly onto it and it stamped quite easily. I stamped it in green 3 times, once vertically and twice horizontally. I used a wet wipe to take off the border. I left the border for the yellow stamps on the base card.


I cut a circle from fun foam, taped it to a stamp block & stamped it in yellow. The sentiment was stamped in green with a Rogue Redhead Designs rubber stamp. Honestly, I chose it because of how it balanced visually, but the pun was an added bonus! I wet the stamp to bleed the ink a bit, for sharp color & an artsy look. The "carp" (Viva Las Vegastamps) was inked once with blue & stamped thrice.

Inspiration/Challenges:
Color Throwdown: Color Combo #388
Less is More #271: 3 stamps (I'm not sure if this counts, but I linked it up)
Shopping Our Stash Challenge #247: You Stamped With What?!!

Update: This was chosen as a Top Pick for Shopping Our Stash Challenge #247!

Thank you for visiting & inspiring my crafting!


Sunday, April 17, 2016

Light & Loss

Although part of life is loss, any death of a loved one leaves a permanent mark. Sympathy cards are so difficult to make & even harder to write; but I think they do give some comfort. Several of my friends have lost pets recently (including us, unfortunately) and I try to send condolence cards. This card isn't for anyone in particular, I was just inspired.


http://daranddiane.blogspot.com/2016/04/yellow-happy-place-to-be.html
"Yellow is a happy place to be"
Inspiration/Challenges:
Double D Challenges: Photo Inspiration
Make My Monday: Pets
Mod Squad Challenge: Make A Negative A Positive

The die cut is from Spellbinder's "Dog Days" set. I cut it from the cardbox box that held a case of dog food; The circle is based on one of the can indentations. I used a circle die to create a mask from scrap paper, and heat-embossed the piece with 2 yellow powders. The cardboard warped a bit after embossing, so I ran it through my BigShot to flatten it.

The border is a yellow mesh bag that once held fingerling potatoes. I glued the mesh onto the white card base with ZipDrip, and then glued the cardboard piece on top.

I used the Faux Patina technique for the dog die-cut & inside negative piece. The former uses blue/green inks and the latter uses yellow/orange inks, along with browns. The wood, star-patterned kraft paper, and woodgrain-patterned paper heart are from my stash.

The background for the negative portion and the sentiment piece are left over from this card I made for a friend who recently lost her Mom; the colors & textures just seem right for condolence cards:

Thank you for visiting & inspiring my crafting!


Pilin' on the Doodles

The theme this fortnight at Pile It On is Doodling. We're sponsored by A Day for Daisies, so I doodled on her beautiful Princess Penny digi stamp!


The sentiment is by the always-generous Paulette at TLC Creations. In Photoshop, I made the background black and the text white, and printed it on pink paper. I cut it into a fish-tail banner, and added some stripes by hand. I used the same pink paper for the background & her dress. Using a flowing ink pen, I doodled in each piece of her dress, adding color to some portions with a neon pink gel pen.

The hot pink bow (so bright!) came in a prize package from The Paper Girls. I used 2 dies to create the frame from a reflective silver cardstock.


http://stickitdown.blogspot.ca/2016/04/april-card-team-reveal.html
Inspiration/Challenges:
A Day for Daises #145: Add Lace + ADFD image
The Corrosive Challenges: Girls, Ladies, Women
The Crafty Addicts: Girly
Crafty Catz: Monochrome
Fab 'n' Funky: Girly and Pretty
Paper Minutes: Ribbons
Stick it Down: Sketch


Thank you for visiting & inspiring my crafting! Hope you'll join us at Pile It On,


Friday, April 15, 2016

Starry Birthday -- Masculine Cards with Crafting with Dragonflies

This fortnight at Crafting with Dragonflies our theme is Masculine Cards. My favorite color combo for male cards are blue & orange, so I used some of my favorite techniques to makes this aperture shaker card:


The card base, plastic shaker cover, and sentiment stamps are from Jillibean Soup. I cut the fish-tail banner from a patterned acetate (I've been hoarding this for the perfect project!) and attached the star-filled shaker piece directly onto it. I traced the banner to make a mask, and inked the base card blue. I heat-embossed the sentiments with a neon orange powder (Recollections). The star-patterned paper on the inside is from my stash.


http://sundaystamps.blogspot.com/2016/04/ssc124-sketch-time.html

Inspiration/Challenges:
Craftin Desert Divas: Shaker
Sunday Stamps #124: Sketch


Thank you for visiting, and hope you'll join us at Crafting with Dragonflies,

Spring has Sprung! -- Seasons at the Crafter's Cafe

It's time for a new challenge at The Crafter's Cafe! This time, we're all about Seasons: What season are you enjoying right now? What's your favorite season? I was inspired by Spring, our current season in Maryland & probably my favorite. It's fun watching everything bloom. I used "Tulip Frame" by Eureka Stamps, one of our generous challenge sponsors.


I colored the image with Copics, using a very light blue for the background. The sentiment is stamped in blue on a woodgrain-patterened paper. I framed both pieces with Kraft paper. The background papers are from my stash (I've had them for years!) and I covered them with a layer of glitter embossing powder.

Inspiration/Challenges:
Crafty Boots: Use a Sentiment
Di's Digis Designs: Embossing
Moving along with the Times #18: Spring Flowers
Use Your Stuff: Kraft + Stash (patterned papers)


Thank you for visiting & hope you'll join us at The Crafter's Cafe,


Sunday, April 10, 2016

Flora & Fauna + Texture with the UnstampaBelles

This month, The UnstampaBelles are challenging you to use the theme of Flora & Fauna with the twist of Add Texture. You can't use any stamps, so let your imagination run wild! I was inspired by the springtime in Arizona.


The background was created to resemble Faux Patina. What a fun technique -- you should join the fun at MFP Stamps this week. For the yellow piece, I used Antique Linen, Mustard Seed, Dried Marigold, and Vintage Photo distress inks; for the greener patina I used Tea Dye, Broken China, Peeled Paint, and Vintage Photo inks. In places where too much gold powder clumped, I sanded it down and added more ink.

The cactus is a Cricut cut I snagged from Mom's stash; she makes beautiful Arizona desert-inspired cards. I used a sort of lazy-lady's version of the smooshing technique to add several colors of green ink. I used white flowers with wood beads from Prima to decorate the saguaro.

The quail are from the Birds of Earth & Sky die from Cheery Lynn Designs. They're cut from a beautiful piece of handmade paper (Recollections).

For the sun (or moon!) element, I inked scrap paper with an orange ink, dabbed it with a watermark ink pad, and coated it with orange embossing powder. It's cut with a circle die.

I cut the banner from more scrap paper, inked it brown, coated it with a thick layer of Glossy Accents and covered it with a mix of taupe mica chips (Stampendous) & a purple/gold chip mix from my stash. While the piece was partially dried but still damp, I added a layer of Brown Sugar embossing powder (Zing).

I left the wood veneer sentiment alone, except for heating it a bit with my heat tool to enhance the dark edges. I'm very pleased with how this came together. Be sure to check out the fabulous projects by my teamies and hope you'll join us this month at UnstampaBelles!


http://latinacrafter.blogspot.com/2016/04/nuevo-reto-de-abril.html
Inspiration/Challenges:
Inkspirational #106: Rock
Latina Crafter #58: Sketch
MFP Stamps Challenge: Faux Patina
Scrapy Land Challenge #39: SL die (Cheery Lynn)

Update: This won the prize for MFP Stamps Week 15 as well as Latina Crafter #58!


Thank you for visiting,


Friday, April 8, 2016

Inlaid Box

When I saw the "Inlaid Dies" Challenge at Addicted to CAS, my first idea was to recreate a wooden box with etching and inlays framed with metal. This was a fun technique; I may have to use it for an actual paper box someday.


The brown square started as a scrap piece of corrugated cardboard; I inked it with brown chalk ink (Quick Quotes) and ran it through my Big Shot with a fancy die. The outer edge cut through but the little pieces didn't, as intended. I sprayed the inner piece with a Satin coating before cutting out the flower (Sizzix) & branch (Sweet Stamps) pieces; I ran these dies through my Big Shot twice to ensure a deep cut. The frames are cut from a gold paper (Recollections) and the inset pieces are cut from a pearly cardstock; I used SU! Wasabi ink for the green parts. I strung some twine around the "box" and used a metal ring to attach a metal Hamsa charm (which I heat-embossed with Gold powder) and a sentiment tag (cut with an EC die & stamped with a Jillibean Soup stamp in Vintage Photo distress ink.) The card front is a lightest beige cardstock. To be honest, this was very much inspired by the urn/box that the Vet put our dear dog Allen into when we lost him a few weeks ago. I miss him very much, and am glad that I have crafting to help me through this time.

http://papersweeties.com/blog/paper-sweeties-inspiration-challenge-april-2016/
Inspiration/Challenges:
Addicted to CAS Challenge #85: Inlaid Dies (2nd entry)
Paper Sweeties: Inspiration #42


Inlaid Friendship

I've had so much fun playing around with ideas inspired by the "Inlaid Dies" Challenge at Addicted to CAS! I actually had some Memory Box die-cuts and the negative pieces in my stash, And they worked perfectly for this. I couldn't make any mistakes, though, since I couldn't cut more! The flowery frame is cut from the same purple paper I used for the card base, but heat-embossed with Orchid Mist powder. After piecing the frame & front panel, I die cut the "friend" & inlaid the sentiment with a piece heat-embossed in the same lovely powder. I stamped the "Hello" directly onto the piece and used the same powder. I'm happy with the fairly CAS result!


Inspiration/Challenges:
Addicted to CAS Challenge #85: Inlaid Dies
WOW Embossing Powder Challenge: Anything Goes with Heat Embossing

Thank you for visiting & inspiring my crafting!


Monday, April 4, 2016

Pinspired Pallet Sign

An email from Pinterest informed me that Pallet Signs are trending, and immediately I was inspired to make a papercraft version.
I cut the three "wood" pieces, including two for the back, from a thick packaging cardboard. I embossed the pieces with an SU!/Sizzix folder, sanded them, inked them with Coral chalk ink (Quick Quotes), and added some distressing with Antique Linen ink. Then I used the two other pieces to make a small pallet shape. I stamped the sentiment (Indigo Blue) in blue (Hampton Art) directly onto it; I'm so pleased with the result! I used my CropoDileII to punch holes in the corners, and strung some lovely seam binding (Paper Sweeties) through them. The bow is more seam binding. The silver brad is from my stash; I textured it with sandpaper. The background is a piece of cardboard from a box of Ginger Snaps, and the card base is a light Kraft paper. I'm thinking I'll send this my SIL for her birthday; she's a very trendy lady!

Inspiration/Challenges:
Cards und More #155: Kraft Cardstock
Less is More #270: White Space but not White (2nd entry)
Stampin' Royalty #323: Wonderful Words


Thank you for visiting & inspiring my crafting!


Sunday, April 3, 2016

Pilin' on the Animal Prints

The theme this fortnight at Pile It On is Animals &/or Pawprints/Animal patterns. We're sponsored by A Day for Daisies. I used the Tote Bag Digital Cutting File by Bird to cut the bag pieces on my Silhouette Cameo.


Inspiration/Challenges:
Allsorts: April fools/humorous (2nd entry)
Alphabet Challenge: C for Cats
Craft for the Craic: Anything But a Card
Crafty Ribbons #147: Tag It
Decorate to Celebrate: Anything 3D Goes
DoubleClick Skittles: Use A Pun or Something Funny
Silhouette Challenges #36: Anything with the Silhouette
QKR Stampede #185: Foolish Thoughts (Something Funny)

Thank you for visiting & inspiring my crafting! Hope you'll join us at Pile It On,


Ballsy Techniques

I'm up late on a Saturday night, listening to quite the Spring storm outside, so it's the perfect time to make a card using some of my favorite challenges & techniques.


The light yellow paper is embossed with a Cuttlebug folder in my BigShot, and then I stamped the sentiments (CAS-ual Fridays) with a bright dark blue ink. The line/dot border (Annabelle Stamps) was stamped twice & embossed with a clear yellow powder. I added 3 gemstones that I colored with a green marker. I added some splatters with a blue spray ink (Tattered Angels); instead of inking the paper, I made droplets on a flat surface & carefully placed the ink droplets for a random effect!

http://stamplorations.blogspot.com/2016/04/april-challenge.html#more
http://sharejoychallenge.blogspot.com/2016/03/share-joy-challenge-29-sketch-and-color.htmlInspiration/Challenges:
Amusing Challenge: Anything Goes
Less is More #270: White Space but not White
Share Joy Challenge: Color Combo
STAMPlorations: Sketch + Stamps & Splatters

Thank you for visiting & inspiring my crafting!